实验二:WIFI Manager以及LinkSprite IO的实验
实验介绍
本实验中主要完成ESP8266的STA+AP工作模式的实现。并在设置完成之后通过网络来做一个简单的与LinkSprite IO交互的实验。
本实验中主要完成的工作为:ESP8266首先创建一个AP,我们把它称为AP1,用手机连接这个AP1,打开浏览器,输入网址:10.0.1.1,会出现一个配置网络的web界面,在该界面上配置ESP8266要连接的 WiFi 的密码,这样LinkNode D1就联网成功了。联网成功后要与LinkSprite进行简单的通信交互。
注意:网络一旦连接成功,下次通电后ESP8266即可自动连接到该 WiFi 上,若找不到该WiFi,则需重新配置。
本实验中需要安装 WiFiManager 库。
实验目的
- 了解并掌握ESP8266芯片的STA+AP工作模式基本原理,以及相关网络通信协议
- 了解并掌握 WiFiManager 库的安装和使用
- 了解并掌握LinkSprite IO与设备进行互通信的机制
- 了解并掌握LinkNode D1连接到云端的具体配置过程
- 提高动手实践和解决问题的能力
软硬件清单 硬件:
- LinkNode R4/R8 x 1
- 具有 WiFi AP的设备 x 1
软件
- Arduino IDE开发环境
实验步骤
1. 安装 WiFiManager 库
- 打开Arduino IDE,选择Sketch->Include Library->Manage Libraries
- 搜索 WiFiManager 并安装

图1.5.1 安装 WiFiManager库
2. 编译运行代码
将LinkNode D1与PC相连,打开Arduino IDE,新建一个文件,将其命名为 WiFiManager.ino,编写代码,编译并上传,完成后 LinkNode D1 创建了一个名 叫“LinkNodeAP”的AP。
3. 配置网络
打开手机无线网络,连接“LinkNodeAP”这个AP
打开网页,输入网址:10.0.1.1,出现如下界面 点击“Configure WiFi”,选择想要连接的AP,输入密码即可。 这样网络配置就完成了,此时,打开串口监视器,就可以查看网络连接情况了。

图1.5.2 配置网络 点击“Configure WiFi”,选择想要连接的AP,输入密码即可。
这样网络配置就完成了,此时,打开串口监视器,就可以查看网络连接情况了。

实验源码
#include    <ESP8266WiFi.h>                                        //https://github.com/esp8266/Arduino

//needed    for    library #include    <DNSServer.h>
#include    <ESP8266WebServer.h>
#include    <WiFiManager.h>                                    //https://github.com/tzapu/WiFiManager
void    setup()    {
//    put    your    setup    code    here,    to    run    once:
Serial.begin(115200);
            //WiFiManager
            //Local    intialization.    Once    its    business    is    done,    there    is    no    need    to    keep    it    arou nd                WiFiManager    wifiManager;
            //reset    saved    settings
            //wifiManager.resetSettings();
            //set    custom    ip    for    portal

            wifiManager.setAPStaticIPConfig(IPAddress(10,0,1,1),    IPAddress(10,0,1,1),    IPAddres s(255,255,255,0));

                //fetches    ssid    and    pass    from    eeprom    and    tries    to    connect                //if    it    does    not    connect    it    starts    an    access    point    with    the    specified    name
                //here        "AutoConnectAP"
                //and    goes    into    a    blocking    loop    awaiting    configuration                wifiManager.autoConnect("LinkNodeAP");                //or    use    this    for    auto    generated    name    ESP    +    ChipID                //wifiManager.autoConnect();
                //if    you    get    here    you    have    connected    to    the    WiFi                Serial.println("connected...    :)"); }
void    loop()    {
//    put    your    main    code    here,    to    run    repeatedly:
}
4.注册并登录 LinkSprite IO
- 进入 www.linksprite.io,注册一个帐号并登录。
- 创建一个设备。
进入My Profile 获取“API Key”。

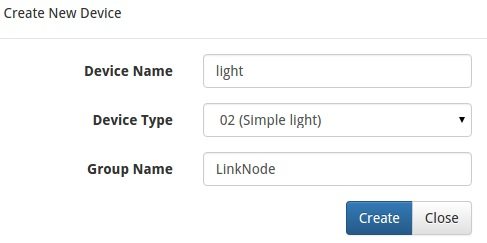
- 点击“created DIY device”按钮,进入Create New Device,其中“Device Name”、“Group Name”可以任意,“Device Type”选02(Simple light),点击“Create”按钮,即可创建一 个设备。
图1.6.2 创建一个设备 - 点击创建的设备,获取设备的“Device ID”。
1.6.3 获取Device ID
5.编译运行代码
- 将LinkNode D1与PC相连,打开Arduino IDE,新建一个文件,将其命名为 LinkspriteIO.ino
- 修改代码中的deviceID和apikey
- 编译代码并上传
- 打开串口监视器,查看串口打印信息,并登录www.linksprite.io查看设备的状态信息
点击Linksprite IO 上的“Light On”和“Light Off”按钮,看LED灯的状态是否有所改变?串口监视 器又打印什么信息?

图1.6.4 实验结果图
实验源码
#include    <ESP8266WiFi.h>
#include    <WString.h>    //the    library    are    needed    for    autoconfig    WiFi #include    <DNSServer.h>
#include    <ESP8266WebServer.h>
#include    <WiFiManager.h>                                //    replace    with    your    own    API    key    and    device    ID,
String    apikey    =
"xxxxxxxxxxxxxxxxxxxxxxxxxxxx";
const    char*    deviceID="xxxxxxxxxxxxx";
const    char*    server    =    "www.linksprite.io";
WiFiClient    client;
int LED=“x”;//x为灯的端口号
void    setup()    {                                                                            Serial.begin(115200);
pinMode(LED,    OUTPUT);
WiFiManager    wifiManager;
wifiManager.setAPStaticIPConfig(IPAddress(10,0,1,1),    IPAddress(10,0,1,1),    IPAddress (255,255,255,0));
wifiManager.autoConnect("LinkNodeAP");
Serial.print("WiFi    Connected    ...\n");
Serial.println("WiFi    connected");
    }
    void    loop()    {            if    (client.connect(server,80))    {                    String        postStr    ="{";                                    postStr    +="\"action\":\"query\",";                                    postStr    +="\"apikey\":\"";                                    postStr    +=    apikey;                                    postStr    +="\",";                                    postStr    +="\"deviceid\":\"";                                    postStr    +=    deviceID;                                    postStr    +="\",";                                    postStr    +=    "\"params\":";                                    postStr    +=    "[";                                    postStr    +=    "\"light\"";                                    postStr    +="]";                                    postStr    +="}";                client.print("POST    /api/http    HTTP/1.1\n");                client.print("Host:    ");                client.print(server);                client.print("\nContent-Type:    application/json\n");                client.print("Content-Length:    ");                client.print(postStr.length());                client.print("\n\n");                client.print(postStr);                        }    delay(1000);    Serial.println("Store    response...");    String    request    =    "";    while    (client.available())    {            char    c    =    client.read();            request    +=c;    }    if    (request!=    NULL)    {            int    index1    =    request.indexOf(":{");            int    index2    =    request.indexOf("},");            String    param    =    request.substring(index1,    index2    +    1);            Serial.print("The    param    is    ");            Serial.println(param);            if(param.indexOf("off")>0){                            digitalWrite(LED,    HIGH);                                            Serial.println("OFF");            }    else    if(param.indexOf("on")>0){                            digitalWrite(LED,    LOW);                                            Serial.println("ON");            }    client.stop();    Serial.println("Waiting...");                    delay(2000);            }
参考文献
[1] http://www.linksprite.com/wiki/index.php5?title=LinkNode_D1